This tutorial provides a quick overview to NESFab and NES programming. It is intended for people with prior coding experience, and for those who know a little bit about making games.
The result of this tutorial will be the basics of a maze game, including the loading of levels and movement of the player.
All example code can be found on the Github.
The NES is an 8-bit video game system from 1983. It features a 6502 CPU, with 2 KiB of general-purpose RAM and 2 KiB of video RAM (VRAM). In addition to the CPU, the NES features two other processing units:
The graphics of the NES are tile-based. Rather than using a framebuffer, positions of various tiles are stored in VRAM, and these positions are used to generate a video signal. Creating visuals is a matter of manipulating values in VRAM.
The audio of the NES is produced from 5 channels: two of them generate square waves, one generates triangle waves, another generates random noise, and the last approximates arbitrary waveforms. Music can be played by manipulating these channels, treating each one as its own instrument. For simplicity's sake, NESFab includes a library that handles this.
The NES is a cartridge-based system. Each cartridge comes with its own hardware, and this hardware can extend the capabilities of the system. The arrangement of this hardware is commonly known as a "mapper".
The NESDev wiki is a wonderful asset to have. In particular, the article on PPU registers will be useful to have for this tutorial.
The first step of a NES project is to pick a mapper. In this tutorial, we'll be using the NROM mapper for our game, which is the same one used for Super Mario Bros. NROM cartridges have two ROM chips: a 8 KiB one for holding the tileset, and a 32 KiB one for holding everything else. For our purposes, the sizes of each chip isn't very important, but the fact that both are ROM is. Other mappers use RAM for holding the tileset, which is slightly different to program for.
With our mapper decided, the next step is to write a configuration file. Configuration files tell the NESFab compiler the type of .nes file we're building, along with all the source files we want to use. The configuration file (maze.cfg) for this project is listed below:
mapper = NROM
nesfab-dir = ./
output = maze.nes
input = lib/nes.fab
input = maze.fabTo finish this step, save the configuration code above into maze.cfg and adjust the lib/nes.fab path if needed.
Now let's create maze.fab: the game's source code. Below is a starting point for this file, which you can copy, paste, and save:
mode main()
    // Set the palette:
    palette = example_palette
    ppu_upload_palette()

    // Loop forever:
    while true

// Define the tileset (commonly called CHR):
chrrom
    file(fmt, "tiles.png")
Lines starting with // are comments; they have no effect and are used for documentation only. Go ahead and read through each comment, and try to piece together what's going on. Don't worry if it's confusing — the next sections will soon explain.
The first line declares a "mode" named "main". Modes are a special type of function which cannot return. Instead of being called, modes are jumped-to.
Typically, modes are used to define the "screens" of a game. For example, you might have one mode for the main menu, another for the gameplay, and a third for the high score table. When you want to change screens, jump to the desired mode.
A mode with the name "main" is doubly special: it's the entry-point to all NESFab programs, meaning that's where execution starts when the game is booted or reset. It's an error if main is missing, so be sure to always have one.
The NES has 52 different colors it can display, but to display a color it must first be loaded into the PPU's VRAM. Unfortunately, VRAM can only hold 25 colors, meaning from those 52 colors, only 25 can be seen at once. The set of those 25 colors is called the palette, and can be switched at runtime.
It's important to realize that VRAM is isolated from regular RAM, and is awkward to manipulate. Because of this, it's common to store copies of the VRAM data in regular RAM, and transfer data from one to another at specific points in the program.
In the example code above, "palette" is a global variable that's a copy of the VRAM palette, and is defined in the nes.fab library code. When the ppu_upload_palette library function is called, the contents of the palette variable will be uploaded to the PPU's VRAM. The example code uses the colors defined by the library-defined example_palette, but you're welcome to define you own.
"CHR" is another named for the PPU's tileset. The NROM mapper has its own ROM chip to hold this data, and that's where the chrrom definition comes into play: it defines that data for this chip.
chrrom uses something called byte block syntax, which is a way of specifying data in NESFab. In the example code above, this syntax is being used to load data from a PNG image.
Below is the PNG image used. You'll need to save this file as tiles.png for the code to work.
With the files saved (maze.cfg, maze.fab, tiles.png), it's time to compile. You can either drag the configuration file onto the NESFab executable, or run the following shell command:
nesfab maze.cfgA maze.nes file should be produced.
If you load the .nes ROM in an emulator, you'll see a black screen. Don't worry, this is to be expected. Although our code prepares the palette and tileset, it doesn't actually do anything with them. Everything we've done is happening behind the scenes.
To see proof you've accomplished something, you'll have to use your emulator's debugging features. Most emulators have a way to view the tileset currently loaded. For FCEUX, click the "Debug" menu and select "PPU Viewer". You should see something like this:
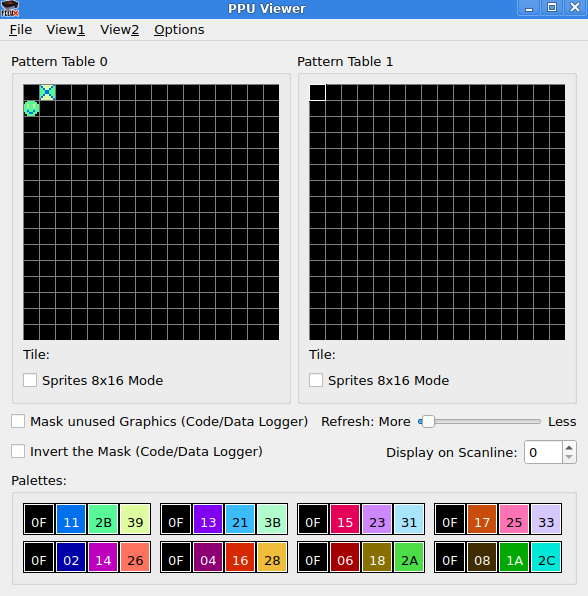
Look! It's the palette and tileset we chose!
It's time to put some visuals on the screen. As stated earlier, graphics on the NES involves placing tiles, but there are actually two ways to do this:
(If you'd like a better description, see dustmop's wonderful article.)
In our maze game, the level will be depicted using the background, while the player will be depicted using a sprite. In this section, we'll focus on the background.
Backgrounds are stored in VRAM in locations called nametables. The PPU will use these nametables to render the screen, and so we must upload our level to these locations.
We've uploaded data to the PPU before (using ppu_upload_palette), but that was a library function. To do it ourselves, we'll have to communicate to the NES using its memory-mapped registers, but don't worry, it's not as hard as it sounds. Below is a quick glance at what it looks like, tucked inside a function:
fn load_level()
    // Tell the NES which VRAM address we want to upload to:
    {PPUSTATUS}()
    {PPUADDR}($20)
    {PPUADDR}($00)

    // Upload 1024 bytes; all ones.
    for UU i = 0; i < 1024; i += 1
        {PPUDATA}(1)
Those {}() operator thingies are used to read and write the NES's memory-mapped registers. The register's address goes inside the curly braces, and the value to write goes inside the parenthesis. If nothing is inside the parenthesis, the operator is treated as a read instead.
The first three operations of that code are telling the NES which VRAM locations we want to edit, which is $2000 (the first nametable location). The address is sent in big-endian order: first the high part of the address is sent, and then the lower. The read to the PPUSTATUS register instructs the NES that we're sending the high part first.
The rest of the code uploads the data. A single byte can be uploaded with a write to the PPUDATA register, so by looping 1024 times, 1024 bytes will be uploaded.
It's worth mentioning that the library includes a helper function for setting the address. By using ppu_reset_addr, our code becomes slightly nicer:
fn load_level()
    // Tell the NES which VRAM address we want to upload to:
    ppu_reset_addr($2000)

    // Upload 1024 bytes; all ones.
    for UU i = 0; i < 1024; i += 1
{PPUDATA}(1)The PPU has two internal flags which determines if it should render the screen or not: one for the background and the other for the sprites. At the start of a program, these flags are set to off, and you won't see anything until you turn them on.
Unfortunately, data cannot be uploaded to the PPU while it is rendering — you must turn both flags off first. This means we must upload our palette and background first, then turn rendering on.
To turn rendering on, it's another register write, but this time to the PPUMASK register. The code to do so is listed below:
    // Turn on background rendering and disable clipping:
    {PPUMASK}(PPUMASK_BG_ON | PPUMASK_NO_CLIP)
Writing PPUMASK_BG_ON enables background rendering, while PPUMASK_NO_CLIP instructs the PPU to render the background over the entire screen.
The load_level is a function, so we'll have to call it from our main mode. Following that, rendering will be turned on. Putting it all together, this section's code becomes:
fn load_level()
    // Tell the NES which VRAM address we want to upload to:
    ppu_reset_addr($2000)

    // Upload 1024 bytes; all ones.
    for UU i = 0; i < 1024; i += 1
        {PPUDATA}(1)

mode main()
    // Set the palette:
    palette = example_palette
    ppu_upload_palette()

    // Load the background:
    load_level()

    // Turn on rendering:
    {PPUMASK}(PPUMASK_BG_ON | PPUMASK_NO_CLIP)

    while true

// Define the tileset (commonly called CHR):
chrrom
    file(fmt, "tiles.png")
If you compile this and run it, you should see the image below:
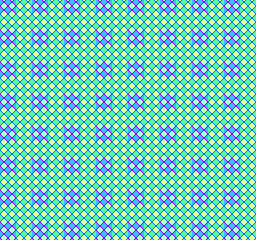
The blue squares in the image above are a result of PPU attributes. In each nametable, the first 960 bytes describe the tiles, while the last 64 bytes — the attributes — describe which palette entries to use for each tile. By writing ones to every attribute, squares of color are created.
Look, squares are nice, but this is a game, not a Rothko! How about setting the background to an actual image, instead of all ones?
To load a level, we'll first need a way to create one. There's a few tools you can use to do this (such as NAWor NEXXT), but to keep this tutorial simple we'll be defining the level directly in the source code.
A trick we can use to keep the syntax pretty is to take advantage of NESFab's charmap feature. Charmaps provide a mapping from characters to integers, and let you define data as strings. Usually, charmaps are used to put text into games, but they're useful for defining levels too.
The charmap we'll use is shown below:
charmap(".#")This charmap defines the character '.' to equal 0, and '#' to equal 1. These correspond to the first two tiles of our tileset.
With this out of the way, let's define our level. The code below does just that:
data /levels
    [] level1
        ("################################"
         "################################"
         "###.#######....#.#......########"
         "###.#...#.###.##.#...........###"
         "###...#.#...#..###......####.###"
         "#######.###.##...#.#########.###"
         "###.....#....#.###.#########.###"
         "###.#####.####.###.#########.###"
         "###.#......#.......#########.###"
         "###...#.####.#####...........###"
         "###.###.#........#.#######.#####"
         "###.....##########....####.#####"
         "###.#.#....#.#.....##.##.....###"
         "###.#.######.########.##.....###"
         "###.#...............#.##.....###"
         "###.###.#.#.####..#.#.####.#####"
         "###.#...###.#.##........##.#####"
         "#####.#.#...#.......###.##.#####"
         "###...#######.#########.##.#####"
         "###.###.....#.######....##.#####"
         "###.....#####.######....##.#####"
         "###.##.##.........##....##.#####"
         "######.#..##.#....###.####.#####"
         "###....#.##..#....###.##....####"
         "###.####.###.#....###.##....####"
         "###.#.##.#.#......###.......####"
         "###.#....#.#......#######.######"
         "###....#.#.######.#######.######"
         "################################"
         "################################")
The first line of this code defines the group "/levels", which we'll placing our data. Groups are an organizational construct the compiler uses to smartly allocate things, so we'll want to put all levels in the same group.
The second line of code defines global data under the name "level1". Beneath that, the data is listed as a byte block, using string literals to define the data with the charmap.
Because games have multiple levels, we'll use a pointer to track which level is being played. The pointer will be defined as a global variable, using this code:
vars /game_vars
    CCC/levels level_ptr
Like the previous code, the first line defines the group this global belongs to. This time, it's a "vars" group, meaning for variables.
The second line of code defines the pointer. CCC/levels is the type, and means a pointer to some data in the /levels group. "level_ptr" is the name of the global variable.
We'll set level_ptr's value just before calling load_level. The @ operator is used to get the address:
    level_ptr = @level1
load_level()With the pointer and data defined, let's redefine load_level to use them. The code below does just that:
fn load_level()
    // Tell the NES which VRAM address we want to upload to:
    ppu_reset_addr($2000)

    // Upload the tile data:
    for UU i = 0; i < 960; i += 1
        {PPUDATA}(level_ptr{i})

    // Then the attributes:
    for U i = 0; i < 64; i += 1
        {PPUDATA}(%00011011)
The first loop copies the data from the pointer, using the {} operator for array access. The second loop sets all attributes to the same value, which will result in a colorful pattern.
Putting all the code together, the result is:
vars /game_vars
    CCC/levels level_ptr

// charmaps can be used to get a nice syntax for defining levels.
charmap(".#")

// The levels are defined here:
data /levels
    [] level1
        ("################################"
         "################################"
         "###.#######....#.#......########"
         "###.#...#.###.##.#...........###"
         "###...#.#...#..###......####.###"
         "#######.###.##...#.#########.###"
         "###.....#....#.###.#########.###"
         "###.#####.####.###.#########.###"
         "###.#......#.......#########.###"
         "###...#.####.#####...........###"
         "###.###.#........#.#######.#####"
         "###.....##########....####.#####"
         "###.#.#....#.#.....##.##.....###"
         "###.#.######.########.##.....###"
         "###.#...............#.##.....###"
         "###.###.#.#.####..#.#.####.#####"
         "###.#...###.#.##........##.#####"
         "#####.#.#...#.......###.##.#####"
         "###...#######.#########.##.#####"
         "###.###.....#.######....##.#####"
         "###.....#####.######....##.#####"
         "###.##.##.........##....##.#####"
         "######.#..##.#....###.####.#####"
         "###....#.##..#....###.##....####"
         "###.####.###.#....###.##....####"
         "###.#.##.#.#......###.......####"
         "###.#....#.#......#######.######"
         "###....#.#.######.#######.######"
         "################################"
         "################################")

fn load_level()
    // Tell the NES which VRAM address we want to upload to:
    ppu_reset_addr($2000)

    // Upload the tile data:
    for UU i = 0; i < 960; i += 1
        {PPUDATA}(level_ptr{i})

    // Then the attributes:
    for U i = 0; i < 64; i += 1
        {PPUDATA}(%00011011)

mode main()
    // Set the palette:
    palette = example_palette
    ppu_upload_palette()

    // Set and load the level:
    level_ptr = @level1
    load_level()

    // Turn on rendering:
    {PPUMASK}(PPUMASK_ON | PPUMASK_NO_CLIP)

    while true

// Define the tileset (commonly called CHR):
chrrom
    file(fmt, "tiles.png")
If you compile this and run it, you should see the image below:

To add a player character to the game, we'll begin by defining two variables for it:
vars /game_vars
    CCC/levels level_ptr
    U px = 128
    U py = 128
"px" and "py" will be the player's position on the screen. By initializing them to 128, the player will start close to the center.
Like the palette, sprite VRAM is duplicated into regular RAM. To update the sprites, we'll modify this regular RAM, then upload it to the PPU all in one go.
Sprite memory is called OAM. It's an array of 64 sprites, where each sprite is comprised of four contiguous bytes: two for the position, one for the tile, and the last one for some extra options. In total, OAM is 256 bytes long.
An effective way to assign to OAM is to treat it like a stack. We'll keep track of an index into the array, incrementing it whenever we add a sprite. Below is code to do setup OAM for our game, with "i" as this index:
fn update_sprites()
    // Our stack index into OAM:
    U i = 0

    // Push a sprite:
    set_oam_x(i, px)     // x-position
    set_oam_y(i, py - 1) // y-position
    set_oam_p(i, $10)    // tile
    set_oam_a(i, 0)      // options
    i += 4

    // Clear the remainder of OAM
    hide_oam(i)
The grunt of this is done by the "set_oam" library functions. These functions assign to the RAM copy of the OAM array. You don't have to use them — you could modify the "oam" array directly — but the library functions take advantage of compiler optimizations better.
At the end of the function, "hide_oam" is called to clear the remaining 63 sprites so that they won't be visible. You might think clearing a sprite involves some special behavior, but actually it's just setting those sprites' Y positions to be off the screen. The NES always renders all 64 sprites in OAM, so the only way to display less is to hide some.
With the RAM copy setup, we'll upload it to the PPU, but if you recall earlier, data cannot be uploaded to the NES while rendering is turned on. We'll need a special way to approach that.
Here's a fun fact: the PPU is closely tied to the video signal. The neat thing about video signals is that after every frame, they enter a special period called VBLANK. Historically, VBLANK was used to reset the electron beam position of CRT televisions. During that period, no graphics data is transmitted.
Once per frame, the PPU stops rendering during VBLANK time, and this gives us a small window to upload data. When VBLANK occurs, the NES has the option of firing an interrupt called an NMI. NESFab includes support for this interrupt, so what we have to do is write an interrupt handler and put our upload code there.
Below is the NMI handler we'll use:
nmi main_nmi()
    // Update OAM and poll the pads:
    ppu_upload_oam_poll_pads(0)

    // Turn on rendering:
    {PPUMASK}(PPUMASK_ON | PPUMASK_NO_CLIP)

    // Reset the scroll
    ppu_reset_scroll(0, 0)
The first function call obviously uploads the OAM, but it also polls the gamepads which we'll be using in the next section. It might seem strange that those two unrelated features are combined into the same library function, but the truth is it's done as a workaround. The NES has a hardware bug related to gamepad polling that causes incorrect values to be returned, but this bug does not occur if the gamepad is polled directly after uploading OAM. It's strange, I know.
The argument to ppu_upload_oam_poll_pads is used to shift the OAM array by some offset, which alters the render order of each sprites. Usually, this isn't desirable and so a zero value is used.
Previously, rendering was enabled in the "main" mode, but now we'll move the PPUMASK write to the NMI. Instead of enabling only background rendering, we'll enable sprites too by using PPUMASK_ON instead of PPUMASK_BG_ON.
Lastly, we'll set the PPU's internal scroll registers using ppu_reset_scroll. These registers control the position of the background, which we want to lock in the up-left corner. It's a good idea to set them each frame, as these registers share circuitry with the PPUADDR register, and thus get altered to strange values whenever data is uploaded to the PPU.
To use our NMI handler, we have to do two things:
The code below does both:
mode main()
: nmi main_nmi
    // Set the palette:
    palette = example_palette
    ppu_upload_palette()

    // Set and load the level:
    level_ptr = @level1
    load_level()

    // Tell the NES to trigger NMI once per frame:
    {PPUCTRL}(PPUCTRL_NMI_ON)

    // Wait forever, one frame at a time:
    while true
        update_pads()
        update_sprites()
        nmi // Wait for the next NMI
The "nmi main_nmi" code attaches the NMI hander to the mode, while the "{PPUCTRL}" line instructs the PPU to send the interrupts.
The while-loop was modified too. "update_pads" is a library function that takes the polled gamepad states and puts it into a variable you can use. Although unnecessary for this step, we'll use it in the next. "update_sprites" is of course our own function, which will call once per frame. Lastly, there's a "nmi" statement., which blocks execution until an NMI occurs. This statement ensures that the loop body happens exactly once per frame.
The final code for this section is listed below:
vars /game_vars
CCC/levels level_ptr
U px = 128
U py = 128
// charmaps can be used to get a nice syntax for defining levels.
charmap(".#")
// The levels are defined here:
data /levels
[] level1
("################################"
"################################"
"###.#######....#.#......########"
"###.#...#.###.##.#...........###"
"###...#.#...#..###......####.###"
"#######.###.##...#.#########.###"
"###.....#....#.###.#########.###"
"###.#####.####.###.#########.###"
"###.#......#.......#########.###"
"###...#.####.#####...........###"
"###.###.#........#.#######.#####"
"###.....##########....####.#####"
"###.#.#....#.#.....##.##.....###"
"###.#.######.########.##.....###"
"###.#...............#.##.....###"
"###.###.#.#.####..#.#.####.#####"
"###.#...###.#.##........##.#####"
"#####.#.#...#.......###.##.#####"
"###...#######.#########.##.#####"
"###.###.....#.######....##.#####"
"###.....#####.######....##.#####"
"###.##.##.........##....##.#####"
"######.#..##.#....###.####.#####"
"###....#.##..#....###.##....####"
"###.####.###.#....###.##....####"
"###.#.##.#.#......###.......####"
"###.#....#.#......#######.######"
"###....#.#.######.#######.######"
"################################"
"################################")
fn load_level()
// Tell the NES which VRAM address we want to upload to:
ppu_reset_addr($2000)
// Upload the tile data:
for UU i = 0; i < 960; i += 1
{PPUDATA}(level_ptr{i})
// Then the attributes:
for U i = 0; i < 64; i += 1
{PPUDATA}(%00011011)
nmi main_nmi()
// Update OAM and poll the pads:
ppu_upload_oam_poll_pads(0)
// Turn on rendering:
{PPUMASK}(PPUMASK_ON | PPUMASK_NO_CLIP)
// Reset the scroll
ppu_reset_scroll(0, 0)
mode main()
: nmi main_nmi
// Set the palette:
palette = example_palette
ppu_upload_palette()
// Set and load the level:
level_ptr = @level1
load_level()
// Tell the NES to trigger NMI once per frame:
{PPUCTRL}(PPUCTRL_NMI_ON)
// Wait forever, one frame at a time:
while true
update_pads()
update_sprites()
nmi // Wait for the next NMI
fn update_sprites()
// Our stack index into OAM:
U i = 0
// Push a sprite:
set_oam_x(i, px) // x-position
set_oam_y(i, py - 1) // y-position
set_oam_p(i, $10) // tile
set_oam_a(i, 0) // options
i += 4
// Clear the remainder of OAM
hide_oam(i)
// Define the tileset (commonly called CHR):
chrrom
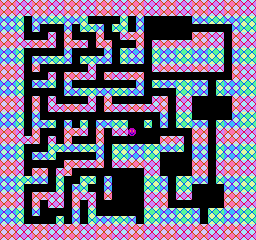
file(fmt, "tiles.png")If you run this code, you should see the following image:
Note the tiny purple smiley face sprite.
Moving the player around is as simple as setting px and py, but we'll want to take collisions with walls into account. To facilitate collision checking, let's start with a function that returns the tile under a specified coordinate:
fn tile_at(U x, U y) U
    // Divide by 8 to get the tile position:
    x >>= 3
    y >>= 3

    // Return the tile:
    return (level_ptr + UU(y * 32))[x]
The coordinates "x" and "y" are first divided by 8, transforming them from pixel units to tile units. Next, the level_ptr will be dereferenced, using these two coordinates as offsets. The x coordinate is added to the pointer without change, while the y coordinate is first multiplied by 32 as the level is 32 tiles wide. The x coordinate is used as the array index, which has the same effect as adding it to the pointer, but produces better assembly code.
Moving the player will done with the code below:
fn move_player()
    // Move the player horizontally based on button presses:
    if pads[0].held & BUTTON_LEFT
        if tile_at(px - 1, py) == '.' && tile_at(px - 1, py + 7) == '.'
            px -= 1
    else if pads[0].held & BUTTON_RIGHT
        if tile_at(px + 8, py) == '.' && tile_at(px + 8, py + 7) == '.'
            px += 1

    // Move the player vertically based on button presses:
    if pads[0].held & BUTTON_UP
        if tile_at(px, py - 1) == '.' && tile_at(px + 7, py - 1) == '.'
            py -= 1
    else if pads[0].held & BUTTON_DOWN
        if tile_at(px, py + 8) == '.' && tile_at(px + 7, py + 8) == '.'
            py += 1
"pads" is a standard library variable storing the state of the gamepads. "pads[0]" is for the first player, while pads[1] is for the second. This variable is set by update_pads, which uses the latest data gathered by ppu_upload_oam_poll_pads.
After checking if a button is being held, the code then checks if the player can move in that direction. Two tests are made — one for each corner the collision edge. If there are no walls at those positions, the player's coordinates are moved.
The move_players function will be called immediately after the update_pads function, inside the main loop. With that added, the project now resembles the start of a game. The final code is listed below:
vars /game_vars
    CCC/levels level_ptr
    U px = 128
    U py = 128

// charmaps can be used to get a nice syntax for defining levels.
charmap(".#")

// The levels are defined here:
data /levels
    [] level1
        ("################################"
         "################################"
         "###.#######....#.#......########"
         "###.#...#.###.##.#...........###"
         "###...#.#...#..###......####.###"
         "#######.###.##...#.#########.###"
         "###.....#....#.###.#########.###"
         "###.#####.####.###.#########.###"
         "###.#......#.......#########.###"
         "###...#.####.#####...........###"
         "###.###.#........#.#######.#####"
         "###.....##########....####.#####"
         "###.#.#....#.#.....##.##.....###"
         "###.#.######.########.##.....###"
         "###.#...............#.##.....###"
         "###.###.#.#.####..#.#.####.#####"
         "###.#...###.#.##........##.#####"
         "#####.#.#...#.......###.##.#####"
         "###...#######.#########.##.#####"
         "###.###.....#.######....##.#####"
         "###.....#####.######....##.#####"
         "###.##.##.........##....##.#####"
         "######.#..##.#....###.####.#####"
         "###....#.##..#....###.##....####"
         "###.####.###.#....###.##....####"
         "###.#.##.#.#......###.......####"
         "###.#....#.#......#######.######"
         "###....#.#.######.#######.######"
         "################################"
         "################################")

fn load_level()
    ppu_reset_addr($2000)
    for UU i = 0; i < 960; i += 1
        {PPUDATA}(level_ptr{i})
    for U i = 0; i < 64; i += 1
        {PPUDATA}(%00011011)

nmi main_nmi()
    // Update OAM and poll the pads:
    ppu_upload_oam_poll_pads(0)

    // Turn on rendering:
    {PPUMASK}(PPUMASK_ON | PPUMASK_NO_CLIP)

    // Reset the scroll
    ppu_reset_scroll(0, 0)

mode main()
: nmi main_nmi
    // Set the palette:
    palette = example_palette
    ppu_upload_palette()

    // Set and load the level:
    level_ptr = @level1
    load_level()

    // Tell the NES to trigger NMI once per frame:
    {PPUCTRL}(PPUCTRL_NMI_ON)

    // Wait forever, one frame at a time:
    while true
        update_pads()
        move_player()
        update_sprites()
        nmi

fn update_sprites()
    // Our stack index into OAM:
    U i = 0

    // Push a sprite:
    set_oam_x(i, px)     // x-position
    set_oam_y(i, py - 1) // y-position
    set_oam_p(i, $10)    // tile
    set_oam_a(i, 0)      // options
    i += 4

    // Clear the remainder of OAM
    hide_oam(i)

fn move_player()
    // Move the player horizontally based on button presses:
    if pads[0].held & BUTTON_LEFT
        if tile_at(px - 1, py) == '.' && tile_at(px - 1, py + 7) == '.'
            px -= 1
    else if pads[0].held & BUTTON_RIGHT
        if tile_at(px + 8, py) == '.' && tile_at(px + 8, py + 7) == '.'
            px += 1

    // Move the player vertically based on button presses:
    if pads[0].held & BUTTON_UP
        if tile_at(px, py - 1) == '.' && tile_at(px + 7, py - 1) == '.'
            py -= 1
    else if pads[0].held & BUTTON_DOWN
        if tile_at(px, py + 8) == '.' && tile_at(px + 7, py + 8) == '.'
            py += 1

fn tile_at(U x, U y) U
    // Divide by 8 to get the tile position:
    x >>= 3
    y >>= 3

    // Return the tile:
    return (level_ptr + UU(y * 32))[x]

// Define the tileset (commonly called CHR):
chrrom
    file(fmt, "tiles.png")